实验环境
(1)硬件环境
机械臂一台:具备视觉识别联动功能的机械臂设备
摄像头:用于采集图像并进行色块识别的视觉设备
色块样本:红、绿、蓝、黄四种颜色的识别目标
(2)软件环境
Vmware虚拟环境:运行Ubuntu系统的虚拟化平台
Python 3.x 环境:支持OpenCV和视觉识别库的运行环境
OpenCV库:用于图像处理和色块识别的计算机视觉库
Jupyter Notebook:用于运行和调试色块定位代码的交互式环境
实验步骤
注意:请确保摄像头视觉范围内出现待测颜色(红、绿、蓝、黄)。
- 启动虚拟机,在Windows电脑中,使用Vmware运行Ubuntu系统。
- 找到路径
/Home/dofbot_ws/src/dofbot_color_follow/色块定位.ipynb,右击选择用Jupyter Notebook启动,输入密码shujia。 - 在Jupyter Notebook界面中运行代码,通过交互控件选择需要识别的颜色。
- 观察摄像头采集的图像中是否成功标记出目标色块,并获取其中心点坐标。
实验结果
-

- 红色方块
-
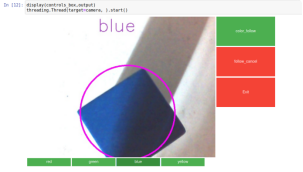
- 蓝色方块
-
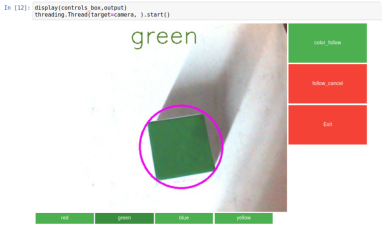
- 绿色方块
-
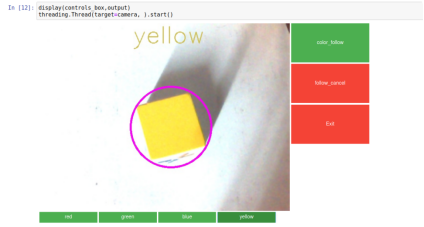
- 黄色方块
主要代码
代码路径:/Home/dofbot_ws/src/dofbot_color_follow/色块定位.ipynb
导入头文件:
import cv2 as cv
import threading
import random
from time import sleep
import ipywidgets as widgets
from IPython.display import display
from positioning import color_follow
主要的识别函数(获取色块目标中心点):
def follow_function(self, img, HSV_config):
    (color_lower, color_upper) = HSV_config
    self.img = cv.resize(img, (640, 480), )
    self.img = cv.GaussianBlur(self.img, (5, 5), 0)
    hsv = cv.cvtColor(self.img, cv.COLOR_BGR2HSV)
    mask = cv.inRange(hsv, color_lower, color_upper)
    mask = cv.erode(mask, None, iterations=2)
    mask = cv.dilate(mask, None, iterations=2)
    mask = cv.GaussianBlur(mask, (5, 5), 0)
    cnts = cv.findContours(mask.copy(), cv.RETR_EXTERNAL,
                          cv.CHAIN_APPROX_SIMPLE)[-2]
    if len(cnts) > 0:
        cnt = max(cnts, key=cv.contourArea)
        (color_x, color_y), color_radius = cv.minEnclosingCircle(cnt)
        if color_radius > 10:
            # 将检测到的颜色用圆形线圈标记出来
            cv.circle(self.img, (int(color_x), int(color_y)), int(color_radius),
                     (255, 0, 255), 3)
            print(color_x,color_y)
    return self.img
创建控件与主进程:
# 创建交互控件
button_layout = widgets.Layout(width='200px', height='100px', align_self='center')
output = widgets.Output()
color_follow = widgets.Button(description='color_follow', button_style='success',
                             layout=button_layout)
choose_color = widgets.ToggleButtons(options=['red', 'green', 'blue', 'yellow'],
                                    button_style='success',
                                    tooltips=['红色', '绿色', '蓝色', '黄色'])
follow_cancel = widgets.Button(description='follow_cancel', button_style='danger',
                              layout=button_layout)
exit_button = widgets.Button(description='Exit', button_style='danger',
                            layout=button_layout)
imgbox = widgets.Image(format='jpg', height=480, width=640,
                      layout=widgets.Layout(align_self='auto'))

# 布局设置
img_box = widgets.VBox([imgbox, choose_color], layout=widgets.Layout(align_self='auto'))
Slider_box = widgets.VBox([color_follow,follow_cancel,exit_button],
                         layout=widgets.Layout(align_self='auto'))
controls_box = widgets.HBox([img_box, Slider_box], layout=widgets.Layout(align_self='auto'))

# 主进程
def camera():
    global HSV_learning,model
    # 打开摄像头
    capture = cv.VideoCapture(0)
    capture.set(3, 640)
    capture.set(4, 480)
    capture.set(5, 30)
    # 循环读取摄像头画面
    while capture.isOpened():
        try:
            _, img = capture.read()
            img = cv.resize(img, (640, 480))
            if model == 'color_follow':
                img = follow.follow_function(img, color_hsv[choose_color.value])
                cv.putText(img, choose_color.value, (int(img.shape[0] / 2), 50),
                          cv.FONT_HERSHEY_SIMPLEX, 2, color[random.randint(0, 254)], 2)
            if model == 'learning_color':
                img,HSV_learning = follow.get_hsv(img)
            if model == 'Exit':
                cv.destroyAllWindows()
                capture.release()
                break
            imgbox.value = cv.imencode('.jpg', img)[1].tobytes()
        except KeyboardInterrupt:
            capture.release()
代码说明:通过OpenCV将采集的图像从BGR格式转换为HSV格式,利用颜色阈值范围进行掩码操作,识别出目标色块。通过轮廓检测找到最大色块并计算其中心坐标,最后在图像上标记色块位置并输出坐标信息。界面控件支持颜色选择、开始/停止追踪和程序退出等功能。